How To Measure And Fit Carpet and Vinyl Flooring
This guide is available as a downloadable pdf here.
Equipment needed: • Pencil • Paper • Tape measure • Calculator •
Measuring Your Room
- Measure the length and width of your room at the longest and widest points, remembering to measure into all alcoves and doorways.
- Add 10cm on to the length and width of the carpet, allowing for waste, seams and additional material that may be needed to complete fitting.
e.g. The room diagram below would be 5.10m long and 3.10m wide. - Calculate the price of your carpet by selecting the 4m or 5m width options on our price calculator.
- If you are ordering carpet with stripes please be aware that the stripes run along the length of the roll and not the width.
- Similarly, if you are ordering a patterned carpet please confirm the pattern repeat with your fitter to aid the fitting process.
Example - Ordering a Carpet:
|
The diagram on the right shows an example room which is 3m and 5m at its widest and longest points. We've chosen a room with diagonal corners to demonstrate the ease of measuring an unconventional room shape.
|
 |
Measuring Your Stairs
STEP 1 - Measuring Stair Length
|
a. Pull the tape measure to the edge of the tread, check the measurement and then add the rise measurement. |
 |
Example:
- If the length of the tread is 15cm and the length of the rise is 15cm, the length measurement for one step would be 30cm.
(This is measuring a step with no nose.) - The average household staircase has 12 steps. e.g. 30cm x 12 = 360cm.
- Add a minimum of 10cm (4 inches) to the total length, allowing for any waste. Taking this into account, the total length would be: 370cm.
 |
REMINDER!If you have a step with overhang (a nose) remember to factor this into your measurements. Please see left for an example diagram. |
STEP 2 - Measuring Stair Width
a. Measure the width of one stair tread, from the wall to the rails.
b. Round your measurement up to the nearest inch or cm.
c. Add a minimum of 5cm (2 inches) to the total width, allowing for any waste.
d. If all of your stairs are the same width, you will only need to measure one.
STEP 3 - Additional Measurements
- Gather all measurements of landings and any other accents, such as doorways and alcoves.
- Account for these additional measurements into your staircase carpet order.
- If you plan to install a carpet runner only, measure the width of the area that you plan to cover and follow the steps above to get the length and width.
- Generally, carpet runners are sold in a variety of standard width measurements.
- When purchasing a carpet runner you do not need to worry about exact width measurements. Simply purchase the width that best suits your needs.
- Irregular shaped stairs; such as winding staircases, should be measured at their widest points.
- For patterned or striped carpets on irregular shaped staircases, you may have to seek advice on a different method for measuring, enabling the pattern or stripes of the carpet to seamlessly flow down your staircase.
Fitting Room Carpet
Equipment needed: • Knee kicker • Carpet grippers • Underlay • Sharp knife • Hammer • Bolster •
1. Carpet Grippers
Carpet grippers are used to hold the carpet in place around the edges of your room. This reduces creases and wrinkles that may appear over time, or when moving furniture.
 |
a. We advise you to use a pipe and cable detector to locate their positions and mark them on the floor so you can avoid them. |
2. Underlay
If your carpet has a felt backing and you intend to fit it without underlay then you can skip this step.
a. Underlay can be cut with a craft knife or heavy scissors.
b. Roll out your underlay and cut it to size, ensuring it is level with your carpet grippers and not covering them.
c. Put the rows of underlay together and join them with carpet tape, making sure each piece is level and not overlapping in any areas.
3. Loosely Laying the Carpet
Carpet can be quite heavy and difficult to manoeuvre, so please make sure that you have assistance at hand in the initial stages of positioning your carpet.
a. Lay your carpet loosely in to position.
b. Stand in one corner of the room with one foot underneath the carpet, pull the corner towards yourself to position it.
(You may find it easier to push or gently kick the carpet towards yourself with your other foot.)
c. Repeat this in the opposite corner until you're happy that the carpet is in the correct position.
4. Fitting the Carpet
If you are fitting a carpet for the first time, or are unsure which area is easiest to fit first, fitting the carpet along your longest wall is the best place to start, working towards your doorway.
a. If you need to cut the carpet, leave around 5 - 7cm of extra carpet at each edge.
b. Cut a vertical line into the excess in each corner, and trim the overlapping carpet to allow you to lay it over the grippers.
 |
 |
 |
c. Use the same process as the corners when fitting around door frames and other difficult areas: cut vertical lines down the edges of the difficult areas and then cut the excess carpet away from the floor edge.
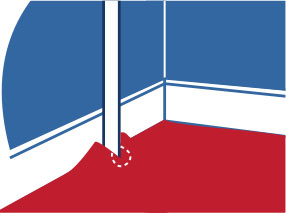
d. When fitting around pipes, cut a straight line from the edge of the carpet to the pipe. Tuck the edges of the carpet down and run your knife around the pipe at a 45 degree angle to trim the excess carpet away.
 |
 |
 |
 |
e. Using a carpet tucker or the flat, blunt side of your knife, firmly crease the edge of your carpet into the skirting.
f. We recommend that you fit a new blade into your knife to ensure a clean cut with no tearing when cutting your carpet.
g. Cut the carpet by angling your blade at a 45 degree angle into the corner where the skirting meets the floor. Ensure you cut above where the floor meets the skirting so you don't cut it short, leaving around 5mm excess.

h. Use a carpet stretcher to hook your carpet onto the grippers.
i. Tuck the excess carpet into the edge using the back of your blade or a carpet tucker if one is available.
Finally, cut the carpet so that it is flush with the flooring in the adjacent room in the doorway. Fit the door bar over the top and screw it into place.
Fitting Carpet on Stairs
Fitting carpets on stairs can be a little challenging and tricky at times. Below are our instructions and recommended tools so you can get your stair carpet fitted without any mishaps.
Preparation
a. Remove all old carpet, underlay, nails and staples from the stairs.
b. Give your stairs a thorough clean before you begin.
Carpet Grippers
a. Leave a gap between the gripper and the riser 3/4 the thickness of the carpet.
b. Fix the carpet gripper to the tread of the stair with the angled edge facing away.

c. Fix another carpet gripper to the riser, with the angled edge facing down.
Underlay
a. Cut pieces of underlay to fit the tread on each step.
b. Make sure underlay meets the grippers and doesn't overlap.

c. If your stairs have nosing, curve your underlay slightly over the edge.
d. Staple into place.
Fitting the Carpet
1. Take your strip of carpet and roll it up, with the underside facing out.
2. Start at the bottom of the stairs, with the pile facing down the stairs so the pile doesn't get rubbed the wrong way as it's stepped on.
3. Tack the carpet to the bottom of the first riser.
4. Pull the carpet up and over the first step, using the knee kicker to stretch it well so that it doesn't ruck up in future as it gets walked on.
 |
 |
 |
5. Use the bolster to push the carpet firmly into the gap between grippers at the stair corners.
6. If your steps have a nose, you may need to tack the carpet just under the nose so that it fits around it snugly. Otherwise it will just stretch over the nose from the bottom of the riser, leaving a gap between the carpet and the top of the riser.
7. Work your way up each step, repeating this process until you get to the top.
8. Take the stair carpet up to the top of the final riser, tack it into place and trim it off in a neat line.
Carpet & Landing
9. If you are carpeting your landing with the same carpet, you can continue with the same piece of carpet on the landing.
10. Pull the landing carpet down over the edge of the top step.
11. If the step has a nose, fix the landing carpet to the underside or if it doesn't have a nose, fix it to the bottom of the first riser to get a neat join.
12. If your stairs and landing carpets are different, you may prefer to take the stair carpet up and over the top step and then put a joining strip or door bar between the two carpets.
*We do not recommend this as it can cause a trip hazard.
13. If you are fitting a stair runner that leaves a gap on either side, you could choose to fit stair rods to complete the look and give you a neat finish.
